Node-RED#
Node-RED is a flow-based development tool for visual programming developed by IBM. It is used to wire together hardware devices, APIs, and online services in new and interesting ways. It provides a browser-based editor that makes it easy to wire together flows using the wide range of nodes in the palette that can be deployed to its runtime in a single-click.
Designing Flows#
The purpose of Node-RED is to create flows that can be used to process data streams. A flow is a sequence of nodes that are connected together to perform a specific task. Each node in the flow represents a function or service that can be used to process data. The nodes are connected together using wires that carry the data between them.
For example, LEAF adapters stream the measurements that is acquired from the adapters to various topics on the MQTT broker.
The HelloWorld example that is part of this setup submits a measurement every second that it is running.
The topic structure is as follows:
<organisation>/<department>/<adapter_id>/<instance_id>/experiment/<experiment_id>/measurement/<measurement>

# Where <xxx> is a placeholder for the actual value.
This is all coordinated from the YAML file in combination with the adapter used.
Getting Started#
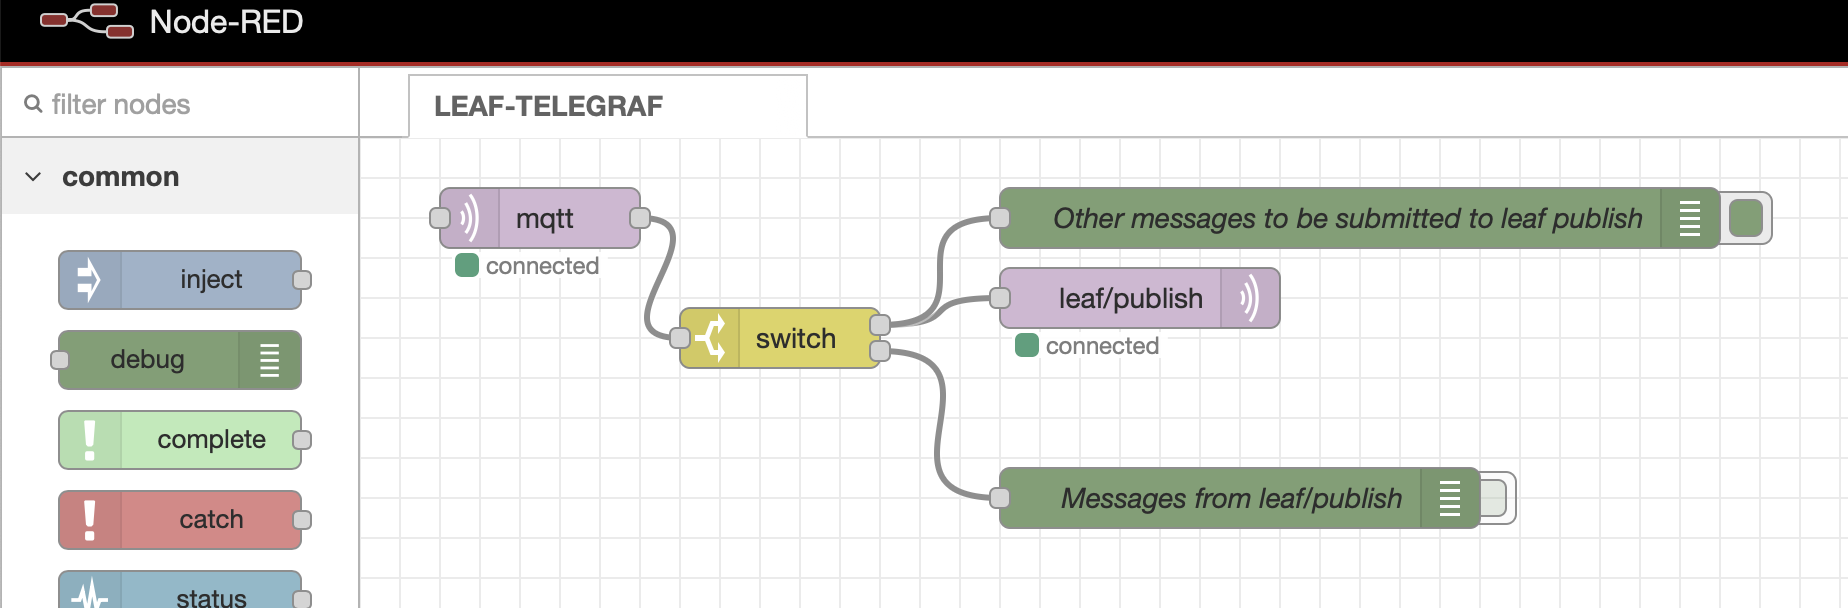
A default workflow is present that listens to the MQTT broker and stores the data in the TimescaleDB. The flow is as follows:
mqtt: This node subscribes to all topics of the broker and listens for incoming messages.
switch: This node filters the incoming messages based on the topic.
If the topic is
leaf/public, the message is ignored as it will be processed by telegraf.
leaf/publish is a MQTT output node that sends the message this specific topic where telegraf is listening.
Green nodes: These nodes are used to debug the message and is shown on the right side of the editor.
Network Configuration#
Node-RED is configured to operate on both the backend and frontend networks:
Backend Network: Communication with TimescaleDB, VerneMQ, and other internal services
Frontend Network: Web interface access for users
Port: 1880 for the Node-RED web interface
Database Integration#
Node-RED is configured with dedicated database access to TimescaleDB:
Database User:
nodered_user(configured in .env)Database Password: Secure password generated during setup
Database Host:
timescaledb(internal Docker service name)Database Port: 5432 (internal only)
This allows Node-RED flows to:
Store processed data directly in TimescaleDB
Read historical data for analysis
Perform complex data transformations before storage
MQTT Integration#
Node-RED is configured to connect to the VerneMQ broker:
MQTT Host:
vernemq(internal Docker service name)MQTT User: Configured through environment variables
MQTT Password: Secure password managed through Docker secrets
MQTT Port: 1883 (internal communication)
Resource Management#
Node-RED is configured with resource limits to ensure stable operation:
Memory Limit: 512MB maximum
CPU Limit: 0.5 CPU cores
Health Checks: Automated monitoring of Node-RED service health
GIT integration#
Node-RED has a built-in GIT integration that allows you to version control your flows. This is done by connecting Node-RED to a GIT repository.
Git repository#
First create a GIT repository on your favorite GIT hosting service. This can be GitHub, GitLab, Bitbucket, or any other service that supports GIT.
Configure Node-RED#
Click on the hamburger menu in the top right corner.
Click on
Git config.Set the git workflow to either:
Manual: All changes must be manually committed under the ‘history’ sidebarAutomatic: Changes are committed automatically with every deploy
SSH Key#
If you want to use SSH authentication, you need to generate a private key in the SSH Keys section.
Fill in a name
Click on
Generate KeyCopy the public key and add it to your GIT repository as a deploy key.
Connect to repository#
Click on the hamburger menu in the top right corner.
Click on
Projects.Click on
New.Click on
Clone repository.Fill in your username and email address.
Next
Fill in the Project name
Fill in the repository URL (SSH or HTTPS)
If you are using HTTPS, fill in your username and password.
If you are using SSH, select the SSH key you generated earlier.
Click on
Clone projectClick on
Done
Committing changes#
If you have set the git workflow to Manual, you need to manually commit your changes. All git operations can be done from the Project History button in the top right corner.
When set to automatic workflow, all changes are committed automatically with every deploy. WARNING: Commit does not mean push. You still need to push the changes to the remote repository manually. Check the commit history for unpushed commits.
Advanced: Node-RED Palette#
There are an amazing amount of nodes available in the palette that can be used to create complex flows. The nodes can be installed from the palette manager. Other nodes can be installed from the Node-RED library.
Click on the hamburger menu in the top right corner.
Click on
Manage palette.Click on the
Installtab.Search for the node you want to install.
Click on
Install
This way you can expand the functionality of Node-RED to suit your needs.
Troubleshooting#
Common issues and solutions:
Node-RED not accessible: Check if the service is running with
docker compose ps noderedMQTT connection failed: Verify VerneMQ is running and credentials are correct
Database connection issues: Check TimescaleDB status and database user credentials
High memory usage: Monitor flow complexity and optimize node usage
For detailed logs, use:
docker compose logs -f nodered